Want to try before you buy? Request a free trial →


To remain successful in today’s economy, many manufacturers are looking for ways to:
As a result, a growing number of manufacturers are employing elements of lean manufacturing, a philosophy Amper embraces. One of the most powerful lean manufacturing tools available to manufacturers is the SMED event.
In a nutshell, SMED events enable manufacturers to identify and remove waste in their changeover processes. All manufacturers, regardless of size, can benefit from SMED. You don’t need any special equipment to conduct a SMED event, although if you’re using Amper’s digital tools, you will enjoy several advantages.
Is it worthwhile? Absolutely. Typically, SMED events reduce changeover times by 30-50%!
Fact: your machines only make money for you when they are making parts. That’s why reducing equipment downtime is the key to improving your factory’s overall equipment effectiveness (OEE).
In most plants we work with, the primary reason for machine downtime is setup and changeovers. Whenever your operators are changing out jobs, programs, tools, materials, and/or parts, it’s likely that the machines are at a standstill at some point. This downtime can be very costly to a company.
Chances are, there’s plenty of hidden waste in your setup and changeover processes. Conducting a SMED event brings this hidden waste to light, so you can eliminate it quickly.
In our experience, changeovers typically take around 2.5-10% of most manufacturers’ available time. Do the math and it’s likely that you can save several thousands of dollars per year by holding a SMED event and following through with your findings.
The principle of SMED was articulated by Shigeo Shingo, a Japanese industrial engineer who operated in the second half of the 20th century. Shingo was an expert on the famous Toyota Production System (TPS), a precursor of the Lean Manufacturing philosophy.
Literally, SMED stands for “Single-Minute Exchange of Die.” “Single-Minute” really refers to “single digit minutes”—i.e., taking less than 10 minutes.
The literal idea was to change out a part in under 10 minutes. Today, it means reducing that “exchange,” or changeover time, to the bare minimum.
NASCAR pit crews are big proponents of SMED. They employ classic SMED techniques to turn a multi-minute tire change and refueling operation into a 12-second pit stop. Their secret? They follow a standardized, optimized process—and you can, too.
Video: 3 mins
Your changeover times will be reduced by studying your changeover process, breaking it down into steps, and then using three specific SMED techniques to eliminate or shorten each step. So, your first step is to assemble your team, which is typically composed of 5-7 employees from different disciplines across your company.
Ensuring your team has horizontal and vertical diversity is important, as perspectives from different departments and organizational levels will bring about the best ideas and calibration. In manufacturing, it’s good to include team members from the following areas:
Facilitator: This role should belong to someone who is experienced in facilitating and remaining impartial.
Operators: We can’t stress this one enough! You must include someone who will eventually adopt the new process. If you do not have this person on your SMED team, it can affect the feasibility and sustainability of the project. Ensure this person actually works on the machines being studied.
Area Supervisors/Managers/Team Leads: This person will also help with sustainability.
Engineers from different disciplines: It’s ideal to have an engineer from both design and manufacturing.
Maintenance: This person can help build any tools, jigs, or guards that might be needed as a result of the event.
Supply chain: This person will act as the voice of the customer and/or will help source any needed supplies.
Finance: You will need a financial point of view to help keep the cost of the project under control
While timing varies, we’ve found that the following schedule generally works well. (These terms may not mean much to you now, but they will soon.)
Step 1: Train your team, map your existing changeover process, and identify internal and external activities.
Step 2: Extract and convert changeover steps.
Step 3: Convert and streamline changeover steps.
Step 4: Streamline steps, document your new process, and define an auditing process.
Step 5: Set an action plan and present your findings!
Thereafter, you’ll want to close out the remaining actions and track your setup time performance on an ongoing basis.
Video: 1 min
Before you hold your event, your team members need to be trained on the basics of SMED. (Feel free to send them this guide if you like.)
Each step of your mapped changeover process will fall into one of two categories.
External activities: Those which can be performed while the machine is running its prior job; that is, activities that can take place externally (off the machine).
Internal activities: Those which can only be handled once the prior job is finished and the machine is turned off; that is, activities that must take place internally (on the machine). The more external activities in your changeover process, the more time efficient it will be.
Often, steps that can be performed externally (while the old job is still running) are treated as internal activities—that is, they aren’t performed until the machine is off.
The objective of SMED is to reduce your internal activities to the bare minimum.
Video: 2 mins
Your team’s first responsibility is to analyze the current changeover process with a gemba walk. (Be sure to review our Essential Gemba Walk Checklist).
Once you’ve analyzed the current processes, you need to document each activity and record how much time it takes to complete. (By the way, total changeover time is measured from the last “good part” of the current run to the first “good part” of the next run.)
Make sure to clearly indicate which steps are currently being done internally vs. externally after mapping it out.
Video: 1 min
In order to reduce as much internal changeover time as possible, your team will analyze each step of the process, determining which of these three SMED techniques to apply:
Extract: Here you’ll remove steps that can be done externally but are currently done internally within the changeover process.
Convert: This means converting steps that are currently internal but could be conducted externally (or partially externally) with some adjustments.
Streamline: This process looks for ways to complete internal steps in a shorter amount of time.
Video: 1 min
Often, manufacturers can reduce their changeover time by 30-50% simply through extraction alone. Your team should ask: What steps can operators perform while the prior job is still running? Common extraction activities include:
Retrieval: parts, tools, materials, instructions, paperwork, etc.
Inspection: parts, tools, and/or materials.
Cleaning: parts, etc. that can be performed while the machine is running.
Quality checks: for the prior production run.
For example, operators can complete the paperwork for the prior job while it’s still running, as well as collect the next work order and tooling. Using the example in the video, you can see that changing the order of the steps performed can minimize the amount of time the machine is off. Extraction reduces a 2-hour changeover time to one hour and 10 minutes—a 42% reduction in changeover time.
Video: 3 mins
Conversion is more complex than extraction. Often, it means breaking down a given step into multiple parts—some which can be performed externally, but some which still must be performed internally. Common conversion activities include:
Advance preparation: Preheating dies or otherwise preparing parts in advance.
Using duplicate jigs: Perform alignments/adjustments in advance of the changeover.
Modularizing equipment: Replace a printer instead of adjusting the print head, so the printer can be configured for a new part in advance of the changeover.
Modifying equipment: Add guarding so parts of the machine can be cleaned safely while the prior job is still running.
For example, operators can collect the bins they’ll need to remove unused raw materials while the prior job is running, although they can’t remove the materials until the machine is off.
Using the example in the video, conversion further reduces changeover time to 33 minutes for a total 72% reduction in changeover time.
Video: 3 mins
Streamlining is typically the most complex step and may require the most engineering. Common streamlining activities include:
Changing releases: For instance, replacing bolts with quick-release clamps.
Eliminating adjustments: Use standardized numerical settings for parts, convert adjustments to multiple fixed settings, or use shims to standardize die size.
Eliminating motion: Reorganize the workspace.
Eliminating wait time: For instance, make the first article inspection a high QA priority.
Standardizing hardware: Reduce the amount of tools needed.
Creating parallel operations: Bring in a second operator for certain steps of the changeover process.
Mechanizing: Generally considered a last resort.
For example, bring in a second operator to load in new raw materials while the first operator programs in the new job to streamline the changeover process.
Using our example in the video, streamlining further reduces changeover time by another 18 minutes, bringing changeover time from an initial 2 hours to 15 minutes for a total 88% reduction in changeover time.
Video: 1 min
Once your team has finished extracting, converting and streamlining the steps of your changeover process, it’s time to document your revised changeover process and the results. It’s also time to present your findings to your organization so the new process can be adopted across other machines. (See the above video for our sample SMED event results.)
Create a project plan with clear owners and due dates to ensure followthrough on the activities.
The owner of the event will be responsible for organizing the final steps.
Common tools used to document results:
• Before-and-after bar chart of time spent at each step
• Standard work combination sheet
• Spaghetti diagram
• 5S checklist
Example report-out agenda:
• Project charter summary
• Initial state summary
• SMED event summary
• Current state summary
• Final tasks and owners
• Sustainment plan — auditing schedule
• Next steps — action plan
Video: 2 mins
It’s unlikely that all of the tasks will get done during the SMED event—and that’s okay! After the event, there may be some outstanding activities to finish up, such as:
• Implementing a 5S checklist
• Creating more jigs/tools
• Ordering setup carts or other tools/materials
• Finishing standard work
• Training operators
Once all the improvements have been implemented factory-wide, you’ll want to track your progress (e.g. by scheduling regular audits) to ensure the new process is followed and that you’re realizing the projected time savings. The rule of thumb is that actions become habits after 21 days. So, ensure the audits occur every day for three weeks to build these habits and reduce auditing to once a month afterwards.
Amper is the simplest real-time production management and analytics tool designed for manufacturers of all sizes.
If you’re an Amper customer—or if you become one—you can use Amper before and after your SMED event to streamline your workload and track your results.

Understand cost of setup with downtime labeling
Before you put the time and effort into conducting a SMED event, you want to first understand if setup and changeover times are a leading cause of downtime at your factory.
Many of our customers were inspired to conduct a SMED event after they completed a few weeks of downtime labeling with Amper. The data helped them understand just how much time was wasted during the changeover process and justified a SMED event.
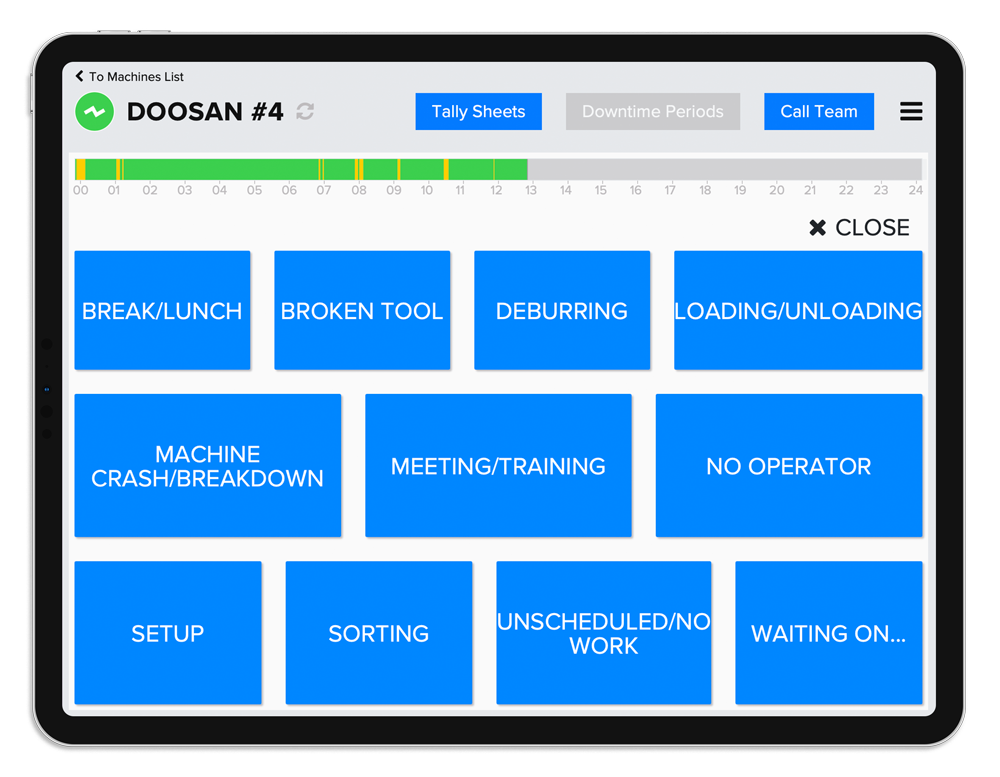
Using Amper’s setup module will save your SMED team several hours of work to map the changeover process. If you’re already using our setup tool, your mapping is already done! Your operator just needs to collect your changeover times.
If you aren’t using the setup tool, why not start now? Let us know what your changeover steps are and we’ll help you upload them to our system and train your operators to track changeover times.
.gif)
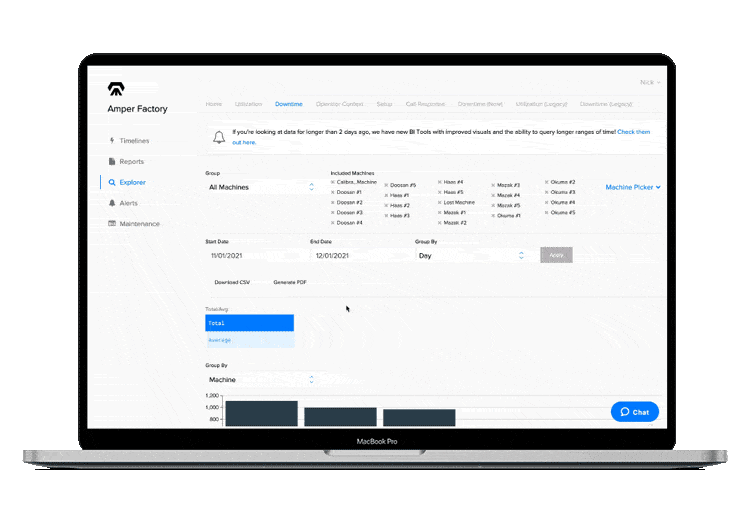
Identify setup bottlenecks
With Amper's operational analytics and reporting, you can do a Pareto analysis of your setup process to understand the 80/20 of your problem steps. That is, which 20% of your steps is taking 80% of your operators' time? Once you identify this, you can focus on fixing those steps first.
With Amper, you can also look at setup times by machine group, machine, part, or operator to help you get more specific with your SMED event.
Validate purchases
You may find that you need to make additional purchases as a result of your SMED exercise. Amper allows you to calculate what your overall savings will be, so you can determine if your proposed purchases are justified and what your payback period will be.
For example, say a conversion step calls for the purchase of setup carts. You know what setup carts will cost. You also know what the new changeover process is saving you in utilization. Therefore, you can measure costs against savings and validate your setup cart purchase.
Track your progress
Once your SMED team has documented your new changeover process, send it to your Amper Customer Success Engineer! We’ll adjust the Amper setup tool to reflect those changes and measure the difference in setup times before and after the event. We’ll help you validate your progress and measure your savings.
Reduce changeover times
Have you ever found out that a machine was still in setup way too late? Have your margins already been shot with that job and now you’re just rushing to get it done?
Going forward, your operators can automatically time their changeovers for every production run. Should changeovers exceed your new goal time, the system will automatically alert the designated escalation team, so issues can be addressed. This will help you audit your ongoing changeovers and make instant decisions to change the outcomes before it’s too late.
These days more than ever, manufacturers need to find ways to improve productivity. Conducting a SMED event is a surefire way to reduce waste and downtime and boost productivity. So is implementing Amper’s production management and analytics solution.
At Amper, our mission is to provide manufacturers with the tools and know-how to run lean and to maximize productivity. Our Customer Success team regularly coaches customers through SMED events—just as they coach customers on getting the most from our production management solution.
Here’s what you should know about Amper: Our solution is the simplest, most accessible system on the market. Forget long, complex integrations—you can self-deploy our equipment on any machine in around 15 minutes.
For most of our customers, it only takes a few hours to get fully up and running—but wow, does it make a difference. Most Amper customers see an overall utilization improvement of anywhere between 2-10%. Most find the system pays for itself in about two months!
If you’re interested in maximizing productivity this way, we’d love to talk to you.
In the meantime, good luck with your SMED event!

